WELCOME TO SHARING SHIP. Get Our Post Daily to Your Mobile Click Here


Wednesday, 21 March 2012

ADD SMOOTH SCROLL TO TOP BUTTON WITH JQUERY TO BLOGGER / BLOGSPOT

0 comments

Add Smooth Scroll to Top Button with Jquery to Blogger / Blogspot

ADD SMOOTH SCROLL TO TOP BUTTON WITH JQUERY TO BLOGGER / BLOGSPOT

WHAT IS DIFFERENCE BETWEEN PREVIOUS AND PRESENT PLUGINS?

In previous Plugin, the Scrolling Starts from bottom with a Certain speed and Maintains Same speed till to reach top of web page

But in this plugin the Scrolling Starts from bottom with a Certain speed and it Ends with Gradually Decreases the speed. this effect is looks more attractive.

Demo

Scroll this page to Bottom and See Demo at bottom right

HOW TO ADD SMOOTH SCROLL TO TOP WITH JQUERY ?

there are 2 Simple Steps
Step 1: Adding Jquery JavaScript Plugin(Ignore this step if your blog have already a Jquery Plugin)

  1. Go to Blogger Dashboard < Design tab > Edit Html
  2. Search for </head> tag
  3. Add below line of code Before </head> tag
    <script src="https://ajax.googleapis.com/ajax/libs/jquery/1.6.4/jquery.min.js" type="text/javascript"></script>


Step 2: Adding Scroll to Top Script


  1. Go to Blogger Dashboard < Design tab > Edit Html


  2. Search for </head> tag


  3. Add below section of code Before </head> tag and Save your Template.


    <style type="text/css">
    #w2btoTop {display:none;text-decoration:none;position:fixed;bottom:
    10px;right:10px;overflow:hidden;width:51px;height:51px;border:none;
    text-indent:-999px;background:url(https://blogger.googleusercontent.com/img/b/R29vZ2xl/AVvXsEjfX95edHOMq8o8iSvCPY-iMbPUGRF4-Ocz4TFerSRLV7hYi_hln3uimEa1eIay2RhvqqgIUH3N81LOUf2Qz6a5vyrZ4Eq2K2Xo9ia3szdn7tHiD1s_Cc-RMWnaWBLO6YAjNIfDuIFr1Osl/) no-repeat left top;}
    #w2btoTopHover {background:url(https://blogger.googleusercontent.com/img/b/R29vZ2xl/AVvXsEjfX95edHOMq8o8iSvCPY-iMbPUGRF4-Ocz4TFerSRLV7hYi_hln3uimEa1eIay2RhvqqgIUH3N81LOUf2Qz6a5vyrZ4Eq2K2Xo9ia3szdn7tHiD1s_Cc-RMWnaWBLO6YAjNIfDuIFr1Osl/) no-repeat left -51px;width:51px;height:51px;display:block;overflow:hidden;float:left;opacity: 0;-moz-opacity: 0;filter:alpha(opacity=0);}
    #w2btoTop:active, #w2btoTop:focus {outline:none;}
    </style>
    <script src="http://bloggerblogwidgets.googlecode.com/files/w2b_jquery.ui.totop.js" type="text/javascript"></script>
    <script type="text/javascript">
    $(document).ready(function(){ $().UItoTop({ easingType: 'easeOutCirc' }); });
    </script>


You Are Successfully Done!


Leave your Comments and Responses about this Widget!


Read more >>
Read More... ADD SMOOTH SCROLL TO TOP BUTTON WITH JQUERY TO BLOGGER / BLOGSPOT

ADD FRESH AND BEAUTIFUL SEARCH BOXES TO BLOGGER / BLOGSPOT

0 comments


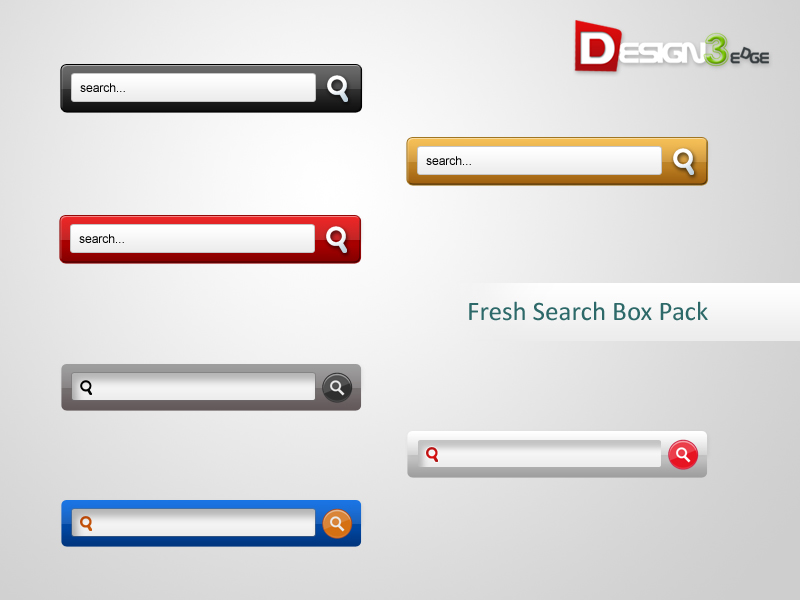
ADD FRESH AND BEAUTIFUL SEARCH BOXES TO BLOGGER / BLOGSPOT

See the Screenshot of PSD source:-

HOW TO ADD BEAUTIFUL SEARCH BOXES TO BLOGGER

  1. Login to Blogger Dashboard -> Design tab -> Page Elements .
  2. Click on Add a Gadget where you wish to place Search Box.
  3. Choose HTML/JavaScript from the List.
  4. Place any one Search Box code in to it and Save the Gadget.
STYLE 1

search box style1

<style type="text/css">
#w2b-searchbox{background:url(https://blogger.googleusercontent.com/img/b/R29vZ2xl/AVvXsEjQ9AZsKGKuID33HJeeKbgV6ovI_SLJKmJ349caoqJtQM9VE5xcOYbFXugFA-fYt55B-B1dWHxclAY918MLZ9oWkvfJ_Jl8rLzyHeeVbiIoZUBSvh3w3I4A7zn71hJIb-p3TeRaEgXwUaJb/) no-repeat scroll center center transparent;width:307px;height:50px;disaply:block;}
form#w2b-searchform{display: block;padding: 10px 12px;margin:0;}
form#w2b-searchform #s{padding: 6px;margin:0;width: 235px;font-size:14px;vertical-align: top;border:none;background:transparent;}
form#w2b-searchform #sbutton{margin:0;padding:0;height:30px;width:30px;vertical-align: top;border:none;background:transparent;}
</style>
<div id="w2b-searchbox">
<form id="w2b-searchform" action="/search" method="get">
<input type="text" id="s" name="q" value="Search..." onfocus='if (this.value == "Search...") {this.value = ""}' onblur='if (this.value == "") {this.value = "Search...";}'/>
<input type="image" src="http://img1.blogblog.com/img/blank.gif" id="sbutton" />
</form>
</div>


STYLE 2


search box style2


<style type="text/css">
#w2b-searchbox{background:url(https://blogger.googleusercontent.com/img/b/R29vZ2xl/AVvXsEgMZ5iSGHKO3TjDYVQtyajfdw4ppazFMXU9DXLY6mkZta2PTYbYgtA0ZR88CP1_MRZNwCTigcR8cKekVubepz2Uvi6dU9X-pzo0OXiJhes-GeMHGB7w-iYTkbHkGg_wQDHypmbxTYDMEODL/) no-repeat scroll center center transparent;width:307px;height:50px;disaply:block;}
form#w2b-searchform{display: block;padding: 10px 12px;margin:0;}
form#w2b-searchform #s{padding: 6px;margin:0;width: 235px;font-size:14px;vertical-align: top;border:none;background:transparent;}
form#w2b-searchform #sbutton{margin:0;padding:0;height:30px;width:30px;vertical-align: top;border:none;background:transparent;}
</style>
<div id="w2b-searchbox">
<form id="w2b-searchform" action="/search" method="get">
<input type="text" id="s" name="q" value="Search..." onfocus='if (this.value == "Search...") {this.value = ""}' onblur='if (this.value == "") {this.value = "Search...";}'/>
<input type="image" src="http://img1.blogblog.com/img/blank.gif" id="sbutton" />
</form>
</div>


STYLE 3


search box style3


<style type="text/css">
#w2b-searchbox{background:url(https://blogger.googleusercontent.com/img/b/R29vZ2xl/AVvXsEhOUVWM73edoWk5BTwXCujBMXt2MLp7qom_RPtwzOufgKxyF59e0NDq53DpusZ2UnpPrvzAR7q6a04wx42aikNPOWpwCg47LH_dJZcS6E4EoWSmI3HyaaSV_UunbLg3qjr7fJth-FjLrzPO/) no-repeat scroll center center transparent;width:307px;height:50px;disaply:block;}
form#w2b-searchform{display: block;padding: 10px 12px;margin:0;}
form#w2b-searchform #s{padding: 6px;margin:0;width: 235px;font-size:14px;vertical-align: top;border:none;background:transparent;}
form#w2b-searchform #sbutton{margin:0;padding:0;height:30px;width:30px;vertical-align: top;border:none;background:transparent;}
</style>
<div id="w2b-searchbox">
<form id="w2b-searchform" action="/search" method="get">
<input type="text" id="s" name="q" value="Search..." onfocus='if (this.value == "Search...") {this.value = ""}' onblur='if (this.value == "") {this.value = "Search...";}'/>
<input type="image" src="http://img1.blogblog.com/img/blank.gif" id="sbutton" />
</form>
</div>


STYLE 4


search box style4


<style type="text/css">
#w2b-searchbox{background:url(https://blogger.googleusercontent.com/img/b/R29vZ2xl/AVvXsEiFReoYj0GSE5OVX4-84YeS2VL5osQFAG7pPinPyNlhirAscehM5mFrV7-yy1i7miTQsfRc2FAF4T4v-6U0zCEYZlSu8LPY7FIN54A3EKRhGvFvl759j_TUHtTJG1iqo3YJDVb3J6EWZ82b/) no-repeat scroll center center transparent;width:307px;height:50px;disaply:block;}
form#w2b-searchform{display: block;padding: 12px;margin:0;}
form#w2b-searchform #s{padding: 6px 6px 6px 26px;margin:0;width: 215px;font-size:14px;vertical-align: top;border:none;background:transparent;}
form#w2b-searchform #sbutton{margin:0;padding:0;height:30px;width:30px;vertical-align: top;border:none;background:transparent;}
</style>
<div id="w2b-searchbox">
<form id="w2b-searchform" action="/search" method="get">
<input type="text" id="s" name="q" value=""/>
<input type="image" src="http://img1.blogblog.com/img/blank.gif" id="sbutton" />
</form>
</div>


STYLE 5


search box style5


<style type="text/css">
#w2b-searchbox{background:url(https://blogger.googleusercontent.com/img/b/R29vZ2xl/AVvXsEjvozlXt39CQ1faKFfayyESUYs67zYgCKYlttKuKcjmDUHdjp7ZpCclFZloplIff2S4zJaKAiciCZohLTe96yb2-YoN9JEvdMu4j-n2JkbXZhRisapMx1yU0prg_r4z23r6FQCFsgDtRpFm/) no-repeat scroll center center transparent;width:307px;height:50px;disaply:block;}
form#w2b-searchform{display: block;padding: 12px;margin:0;}
form#w2b-searchform #s{padding: 6px 6px 6px 26px;margin:0;width: 215px;font-size:14px;vertical-align: top;border:none;background:transparent;}
form#w2b-searchform #sbutton{margin:0;padding:0;height:30px;width:30px;vertical-align: top;border:none;background:transparent;}
</style>
<div id="w2b-searchbox">
<form id="w2b-searchform" action="/search" method="get">
<input type="text" id="s" name="q" value=""/>
<input type="image" src="http://img1.blogblog.com/img/blank.gif" id="sbutton" />
</form>
</div>


STYLE 6


search box style6


<style type="text/css">
#w2b-searchbox{background:url(https://blogger.googleusercontent.com/img/b/R29vZ2xl/AVvXsEjcXAgj_z3fBFyu7joaMPqXc-bX8btNMbrBPSYPfWBmLV39uwSL7MPeqm1UscmY7nLHVOajzc9roHt_2X_SaZPw09PEz1uYPrzAbWJZn4icXmRXzSn6dP8BNEIE37s8Biyc3JOVz_OrGFm2/) no-repeat scroll center center transparent;width:307px;height:50px;disaply:block;}
form#w2b-searchform{display: block;padding: 12px;margin:0;}
form#w2b-searchform #s{padding: 6px 6px 6px 26px;margin:0;width: 215px;font-size:14px;vertical-align: top;border:none;background:transparent;}
form#w2b-searchform #sbutton{margin:0;padding:0;height:30px;width:30px;vertical-align: top;border:none;background:transparent;}
</style>
<div id="w2b-searchbox">
<form id="w2b-searchform" action="/search" method="get">
<input type="text" id="s" name="q" value=""/>
<input type="image" src="http://img1.blogblog.com/img/blank.gif" id="sbutton" />
</form>
</div>


Read more >>
Read More... ADD FRESH AND BEAUTIFUL SEARCH BOXES TO BLOGGER / BLOGSPOT

MASHABLE STYLE SOCIAL SUBSCRIPTION WIDGET FOR BLOGGER/BLOGSPOT

0 comments

Mashable Style Social Subscription Widget for Blogger/Blogspot

Mashable Style Social Subscription Widget is cool widget for blogger. As the Title say’s this widget is from Mashable.com. I seen in most WordPress blogs are using this widget. I am giving this widget with a great options to customize this widget for Blogger. Actually I get ready this widget 2 weeks ago. but I hold this widget because of Google+ Badge. Google+ Badge is not realizable and it’s width is Fixed to 300px wide. Now they added the customization of width and Height. and also Google+ Badge is coming in two Color schemes.(Dark and Light).

Widget Preview

Mashable Style Social Subscription Widget for Blogger/Blogspot

FEATURES:

  • Adjustable Width.
  • Only Selected Social Network to Show.
  • 7 Styles of Email Subscribe Buttons.
  • Included 16 Social Button Icons.
  • Background Color Customization.
HOW TO INSTALL MASHABLE STYLE SOCIAL SUBSCRIPTION WIDGET ON BLOGGER?

As usual i given a Widget generate form. I work hard and build the Widget form so it very easy to Add this widget for you.

  1. Go to the Widget Generator by clicking the below Button.
  2. Provide Require widget title and Valid blog URL.
  3. Fill Width of the Widget. I recommend 300px or More. But must not Less then 100px. Because Google+ badge least width is 100px.
  4. To show the Google Badge you need to Fill the Google Page ID. you can get the G+ Page ID form it’s URL.
    My Google+ Page URL is https://plus.google.com/105370464976454684137
    My Google+ Page ID is 105370464976454684137
  5. Like so, to Get the Feedburner ID
    My Feedbuner URL is http://feeds.feedburner.com/yoursite
  6. My Feedbuner ID is yoursite
  7. I am given 16 Other Social Network buttons in the widget. so Just Select a Network and Fill the URL finally Click the Add Button.
    You can also Sort them by dragging. :)
  8. Finally Click the Generate Button and Enjoy :D

WIDGET GENERATOR

Read more >>
Read More... MASHABLE STYLE SOCIAL SUBSCRIPTION WIDGET FOR BLOGGER/BLOGSPOT

STATIC FOLLOW BY EMAIL POP OUT WIDGET FOR BLOGGER / BLOGSPOT

0 comments

Static Follow By Email Pop Out Widget for Blogger / Blogspot

STATIC FOLLOW BY EMAIL POP OUT WIDGET FOR BLOGGER / BLOGSPOT

Token : TDJCTWKHHMKU
Static follow by Email Widget is a New Widget for Blogger/Blogspot. This is Actually a WordPress Plugin. Now it is available for Blogger Blogs. This Widget is Jquery Based widget with Nice and smooth Popout effect. You will get more email subscribers with this widget and Very easy to Install in your Blog.

Look at Preview of this Widget.
Static Follow By Email Pop Out Widget for Blogger Preview

HOW TO INSTALL POP OUT FOLLOW BY EMAIL WIDGET?

As this widget based on jQuery plugin, First you need to have a jQuery Plugin in your Blog template.
This Step is Required, If your Blog already have this plugin then Ignore this Step.
If your Blog Don’t have this Plugin, Install the jQuery Plugin.
Add the below line of code before </head> tag.

<script src="https://ajax.googleapis.com/ajax/libs/jquery/1.7.1/jquery.min.js"></script>


INSTALLING WIDGET:-


In this Second Step, I am giving two ways to install this widget. Both will give the Same Effect.


  1. By Adding Widget Code to Template.


  2. Using Widget Generator.


BY ADDING WIDGET CODE TO TEMPLATE


This will converts Follow By Email Official Blogger Widget to a Pop out follow by Email Widget.


  1. First Add Follow By Email Official Blogger Widget to Your Page Elements Layout.


  2. Add the Below Section Of code before closing </head> tag.


    <style type="text/css">
    /*<![CDATA[*/
    .FollowByEmail {background-color: #464646;width: 220px;color: #fff;position: fixed;z-index: 999999;right: 10px;bottom: 0;}
    .followOpened {-webkit-border-radius: 2px 0 0;-moz-border-radius: 2px 0 0;border-radius: 2px 0 0;-webkit-box-shadow: 0 0 8px rgba(0, 0, 0, 0.5);-moz-box-shadow: 0 0 8px rgba(0, 0, 0, 0.5);box-shadow: 0 0 8px rgba(0, 0, 0, 0.5);}
    .w2bfollowButton {background: #464646;color: #CCC;font-size: 13px;line-height: 28px;padding: 0 10px;text-decoration: none;position: absolute;top: -28px;right: 0;display: block;-webkit-box-shadow: 0 -1px 5px rgba(0, 0, 0, 0.2);-moz-box-shadow: 0 -1px 5px rgba(0, 0, 0, 0.2);box-shadow: 0 -1px 5px rgba(0, 0, 0, 0.2);-webkit-border-radius: 2px 2px 0 0;-moz-border-radius: 2px 2px 0 0;border-radius: 2px 2px 0 0;height: 28px;}
    .w2bfollowButton span {background: url("https://blogger.googleusercontent.com/img/b/R29vZ2xl/AVvXsEhbdR2iS-p8cpNZbsXAaS3iJS0RU8GqNMwFiSTivz3_tBQ-XhM7mT9Ug4Wv-1QI2JYh2NLQHUelvOlWwMWnBpVBQu4pHdcfNTHGyqhhg5D-96MXiD23X5N0p4Kpvmpti3J6mhMJdk77Sb8W/s1600/follow-w2b.png") no-repeat scroll 0 3px transparent;padding-left: 15px;}
    .w2bfollowButton:hover,.followActive {color: #fff !important;}
    .w2bfollowButton:hover span,.followActive span {background-position: 0 -37px !important;}
    .followactive {background-color: #333;}
    .follow-by-email-inner {padding: 15px;}
    .FollowByEmail h2 {padding: 15px 15px 0;font-size: 18px;margin: 0 0 10px;font-weight: normal;}
    .follow-by-email-inner p {margin: 0 0 10px;}
    .follow-by-email-inner .follow-by-email-address {width: 95%;padding: 2px 4px;margin: 0 auto;-webkit-border-radius: 3px;-moz-border-radius: 3px;border-radius: 3px;font-size: 15px;border: 1px solid #444;color: #888;display: block;clear: both;}
    .follow-by-email-inner form {text-align: center;}
    .follow-by-email-inner td{display: inline-block;width:100%;text-align:center;}
    .follow-by-email-inner .follow-by-email-address:focus {color: #000;border-color: #000;}
    .follow-by-email-inner .follow-by-email-submit {cursor: pointer;padding: 2px 20px;background: #333;background: -webkit-linear-gradient(top, #333 0%, #111 100%);background: -moz-linear-gradient(top, #333 0%, #111 100%);background: -o-linear-gradient(top, #333 0%, #111 100%);background: -ms-linear-gradient(top, #333 0%, #111 100%);background: linear-gradient(top, #333 0%, #111 100%);color: #ccc;text-shadow: 0 1px 0 #000;border: 1px solid #282828;-webkit-border-radius: 11px;-moz-border-radius: 11px;border-radius: 11px;-webkit-box-shadow: inset 0 1px 0 #444;-moz-box-shadow: inset 0 1px 0 #444;box-shadow: inset 0 1px 0 #444;text-decoration: none;-webkit-transition: all 0.25s ease-in-out;-moz-transition: all 0.25s ease-in-out;-o-transition: all 0.25s ease-in-out;-ms-transition: all 0.25s ease-in-out;transition: all 0.25s ease-in-out;margin: 1em 0 1em 0;}
    .follow-by-email-submit:hover {background: #222;background: -webkit-linear-gradient(top, #333 0%, #222 100%);background: -moz-linear-gradient(top, #333 0%, #222 100%);background: -o-linear-gradient(top, #333 0%, #222 100%);background: -ms-linear-gradient(top, #333 0%, #222 100%);background: linear-gradient(top, #333 0%, #222 100%);color: #fff;-webkit-box-shadow: inset 0 1px 0 #4f4f4f;-moz-box-shadow: inset 0 1px 0 #4f4f4f;box-shadow: inset 0 1px 0 #4f4f4f;text-decoration: none;}
    .follow-by-email-submit:active {background: #111;background: -webkit-linear-gradient(top, #111 0%, #222 100%);background: -moz-linear-gradient(top, #111 0%, #222 100%);background: -o-linear-gradient(top, #111 0%, #222 100%);background: -ms-linear-gradient(top, #111 0%, #222 100%);background: linear-gradient(top, #111 0%, #222 100%);color: #aaa;-webkit-box-shadow: inset 0 -1px 0 #333;-moz-box-shadow: inset 0 -1px 0 #333;box-shadow: inset 0 -1px 0 #333;text-decoration: none;}
    .w2bFollowFooter {text-align: center;font: normal 11px "Helvetica Neue", sans-serif;padding: 7px 0;margin: 0 0 -15px !important;border-top: 1px solid #3c3c3c;}
    .w2bFollowFooter a {color: #aaa;text-shadow: 0 1px 0 #262626;background: none;text-decoration: none;}
    .w2bFollowFooter a:hover {color: #fff;background: none;}
    /*]]>*/
    </style>
    <script type="text/javascript">
    /*<![CDATA[*/
    ;(function(w2b){w2b(document).ready(function(){w2b.extend(w2b.easing,{easeOutCubic:function(x,t,b,c,d){return c*((t=t/d-1)*t*t+1)+b}});var followBox=w2b(".FollowByEmail");followBox.prepend("<a class=\"w2bfollowButton\" href=\"#\"><span>Follow</span></a>");w2b("<p></p>",{class:"w2bFollowFooter",html:"<a href=\"http://feedburner.google.com\" target=\"_blank\">Delivered by FeedBurner</a>"}).appendTo(followBox.find(".follow-by-email-inner"));followBox.find("td:last").removeAttr("width");var followHeight="-"+followBox.outerHeight()+"px";followBox.hide().css({bottom:"-500px"});setTimeout(function(){followBox.show().animate({bottom:followHeight})},500);w2b(".w2bfollowButton").click(function(e){if(followBox.hasClass("followOpened")){w2b(this).removeClass("followActive");followBox.removeClass("followOpened").animate({bottom:followHeight},{duration:200,easing:"easeOutCubic"})}else{w2b(this).addClass("followActive");followBox.addClass("followOpened").animate({bottom:"0"},{duration:400,easing:"easeOutCubic"})}e.preventDefault()})})})(jQuery);
    /*]]>*/
    </script>


  3. Save the Template!


USING WIDGET GENERATOR


  1. Click this below Button .

    WIDGET GENERATOR


  2. Must Fill the Feedburner ID.

    Ex:-


    My Feedbuner URL is http://feeds.feedburner.com/yoursite


    My Feedbuner ID is yoursite


  3. Customize the Settings as you need.


  4. Add the Widget to Your Blog and Enjoy!


Any Feature Request or Suggestions are welcome. Feel free to share this widget and leave your comments.


Read more >>
Read More... STATIC FOLLOW BY EMAIL POP OUT WIDGET FOR BLOGGER / BLOGSPOT

NEW EASY INSTALL FLASH ANIMATED LABEL CLOUD WIDGET FOR BLOGGER

0 comments

New Easy Install Flash Animated Label Cloud Widget For Blogger

Live Preview :-
Here You will see the http://buzz.blogger.com flash animated label Cloud.

Click Here!

WHAT’S NEW?

  1. New SWFobject Script
  2. Uses the Blogger API and Pulls the Labels
  3. No Need to Edit the Template.
  4. You can Place this Label Cloud Widget inside a Post and Any Where :)
HOW TO INSTALL NEW FLASH ANIMATED LABEL CLOUD WIDGET?
  1. Click the Widget Generator Button
  2. Customize the Settings as you need
  3. Click on Generate button and add widget to your Blog

WIDGET GENERATOR

Read more >>
Read More... NEW EASY INSTALL FLASH ANIMATED LABEL CLOUD WIDGET FOR BLOGGER

NEW FACEBOOK POPOUT LIKEBOX VERSION 2 FOR BLOGGER- All Direction Available..

0 comments

New Facebook Popout Likebox Version 2 for Blogger

Hi, Here is the New Updated Facebook Popout Likebox Gadget of Version 2 for Blogger. This is Updated Release Comes with Highly Customizable options. Many of Readers asking How change the position from right to left, Width and Height. With this Updated version you can customize those options as well as Background Colors and Facebook Badge Color also.

LIVE PREVIEW

Click here for Live Demo

HOW TO INSTALL FACEBOOK POPOUT LIKEBOX VERSION 2 ?

First you need to have a jQuery Plugin in your Blog template.
This Step is Required, If your Blog already have this plugin then Ignore this Step.
If your Blog Don’t have this Plugin, Install the jQuery Plugin.
Add the below line of code before </head> tag.

<script src="https://ajax.googleapis.com/ajax/libs/jquery/
1.7.1/jquery.min.js"></script>


  1. Click the Widget Generator Button


  2. Customize the Settings as you need


  3. Click on Generate button and add widget to your Blog


WIDGET GENERATOR


Read more >>
Read More... NEW FACEBOOK POPOUT LIKEBOX VERSION 2 FOR BLOGGER- All Direction Available..

Create Blogger Backup For Images And Get Image URLs

0 comments

Backup-Images-in-BloggerMany bloggers including some professional ones suggest to store Blogger images on services likewww.Photobucket.com , www.tinypic.cometc. but I really don’t understand why would someone do that when one has unlimited Image storage and bandwidth inside Picasa web albums that is where Blogger saves all your images. Well its time to change the way people use Blogger and we are here to let you help make better use of resources available to you.

Today I will share a different way of managing all your images in blogger by letting you know how to create a Backup for all your images and we will also learn how to get Unique URLs for images. This tutorial will also help you in reducing your blog load time by 40% i.e 150-200kb

To create an Image Backup you will need to do the following,

  • Go To Blogger
  • Create a draft Post and name it Backup For Images
  • Now start uploading all your images to blogger using the normal method. These images can be images that you have saved elsewhere and have link to it in your blogger template. For example: Background Image, Sidebar Headers, Icons, Header Background etc. If you scan your template you will find many image URLs inside the CSS part that starts from <b:skin> and ends at </b:skin>. An image URL/link can end as .gif  | .png  |  .jpeg   |  .bmp etc. Open each URL/link in your browser and save the image in your Hard Drive by right clicking on it and then choosing “Save Image As”

  • Once you have uploaded all your images, your backup will look like that of mine,

BACKUP FOR IMAGES

  • Now Comes the interesting part. In order to get Image URLs and use them somewhere inside your blog template or sidebar widgets, you will need to do the following,
    • Make sure you are using Firefox Browser
    • Click the Preview Link at the top-right corner of your Backup post

    Preview-link

    • Once the images are displayed below the draft post, simply right click on your desired image and then choose “Copy Image Location”

      Copy-Image-Location

    • Now paste this Image URL inside your Browser Address bar,

Paste-Image-URL-in-Browser-

  • Your Image URL will look something like the one below,

http://4.bp.blogspot.com/_7wIwo/Spr1Lxjk6I/AABu0/uS0zY4/s400/MyBloggerTricks.jpg

The important part in this link is s400 . If you want the image to appear in full size then change s400 to s1600 . The image will appear in its original size.

Now this is how I store all my images and get their unique URLs. This way you will never loose images. By adding such image URLs to your blogger templates, you will observe a significant decrease in the load time of your blog.

Read more >>
Read More... Create Blogger Backup For Images And Get Image URLs

Back To Top and Back To Bottom Buttons For Blogs

0 comments

back to bottom buttonsI wondered why don't we use back to bottom buttons just like back to top and this idea led me to jump at Photoshop again. The collection today consists of 20 high quality PNG static images that will allow your visitors to scroll up or scroll down thus making site navigation more easy and enjoying. Visitors are often too lazy to click Home or End button in the keyboard to scroll up or down the page and therefore these buttons will offer a much better flexibility to users to jump up or down as they wish and enjoy browsing through your blogs.

Live Demo

BACK TO TOP AND BACK TO BOTTOM BUTTONS

Download

How To These Buttons in Blogger?

Whether you are a blogger user or wordpress or you use any other CMS, the code below works for all platforms and is compatible with all browsers.

  1. Go To Blogger > Design
  2. Choose HTML/JavaScript widget
  3. and paste these two codes inside it and hit save. That's it!

For scrolling Down use this code:

<a rel="nofollow" style="display:scroll;position:fixed;top:10px;right:5px;" href="#footer" title="Back to Top"><img src="ADD URL OF BACK TO BOTTOM BUTTON HERE"/></a>

Make sure to replace the bolded text with the link of your button. If for some reason the button didn't work then replace footer with credits. You can upload your button on blogger by read this post:

For scrolling Up use this code:

<a rel="nofollow" style="display:scroll;position:fixed;bottom:10px;right:5px;" href="#" title="Back to Top"><img src="ADD URL OF BACK TO TOP BUTTON HERE"/></a>

Again fill up the required detail with the link/url of back to top button.

 
Read more >>
Read More... Back To Top and Back To Bottom Buttons For Blogs

Most Popular 700+ Smashing Web2.0 Icons For Web Designing- Free!

0 comments

web2-icon-setFree Icons, buttons or any blogger goody is something that is always welcomed by all. I am sharing some of my Freeware Icon collection that I have collected over the recent years for my designing projects. This web2.0 icon set contains everything you may need, from blog icons, forums, iphone, social media networks till RSS icons. All packed in one jumbo magic set! To get a free png copy of the this great collection, kindly submit your Email ID below in order to become a valuable MBT reader and avail tons of such resources for free.

Download Now

Read more >>
Read More... Most Popular 700+ Smashing Web2.0 Icons For Web Designing- Free!

Floating Feedback Buttons For Blogger New

0 comments

FEEDACK-BUTTONS The set below consists of 10 PNG buttons along with the PSD file if in case you wanted a color of your choice.

Download Set

How to Add a Feedback Button to Blogger

The steps are very simple. Download the icons and upload your favorite feedback button in Blogger. Once done, you may then follow few steps below,

  1. Go To blogger > Design
  2. Choose a HTML/JavaScript Widget
  3. Paste the following code inside it,

<a style="display:scroll;position:fixed;bottom:50%;left:0px;" href="URL OF CONTACT PAGE" title="Feedback Please, Can't go further without your help"><img src="FEEDBACK BUTTON IMAGE LINK" /></a>

Make these changes:

  • By default the button will appear at center left but if you want to shift it to right then change left to right.
  • Replace URL OF Contact page with the address link of your contact me page.
  • Replace Feedback Please, Can't go further without your help with any message you may like the visitors to see when they hover their cursor on the button
  • Replace FEEDBACK BUTTON IMAGE LINK with the image link of your uploaded button

       4.   Save your template and see it hanging on your blog! :)

Read more >>
Read More... Floating Feedback Buttons For Blogger New

Add Updated Modern Floating Feedback Buttons in Blogger

0 comments

FEEDBACK-BUTTONSHere is yet another PNG set for Feedback buttons which can be added in a similar method as we did for the previous Feedback Buttons set. This time we will mouse hover effect to these buttons. The buttons will change color on mouse hover. You can do that using a simple code as shared below,

Download

Add Floating Feedback Buttons With Mouse Hover in Blogger
  1. Go To Blogger > Design > Page Elements
  2. Select HTML/JavaScript widget
  3. Paste the following code inside it,

<a style="display:scroll;position:fixed;bottom:10px;left:0px;" href="URL OF CONTACT PAGE" title="Feedback Please, Can't go further without your help"><img onmouseover="this.src='IMAGE LINK 2'" src="IMAGE LINK 1" onmouseout="this.src='IMAGE LINK 1'"/></a>

Make these changes:

  • Replace URL OF CONTACT PAGE with the Link of your contact page
  • Replace IMAGE LINK 1 with the URL of image in active mode
  • Replace IMAGE LINK 2 with the URL of image which appears on mouse hover
  • Change left to right if you want the button to appear at right side of your page

     4. Save your widget and you are done!

Read more >>
Read More... Add Updated Modern Floating Feedback Buttons in Blogger

Change Newer Posts, Older Posts and Home Links With Cute Images

0 comments

Next-Previous-Home-Images

The New Year is near and I thought why not gift my Blogger Readers with some thing that may be useful to them. I have created some Cute button images for the Newer Posts, Older Posts and Home Links that appear below all BlogSpot blogs. I hope you will like them.

This Button Set consists of seven image sub-sets categorized as small, large and medium and all are compressed in png format so it can be used in blogs with any background colour.

Have a look at them first,

Download

How To Add these Images instead of Newer Posts, Older Posts and Home Links in Blogger

I have already discussed this in my previous post Replace Newer, Older And Home Links With Shiny Buttons In Blogger Kindly read it. You will find some different buttons there!

Download These Buttons

To prevent misuse of our Blogger resources and goodies ,we offer all resources for free by email to our subscribers only. If you have not subscribed yet kindly do so by submitting your email address in the subscription form on the right sidebar. By becoming a subscriber you will indeed receive quality Blogger Resources that you never expected to get for free!

Subscribers have been emailed these Icons. Kindly Check your Inboxes.

Read more >>
Read More... Change Newer Posts, Older Posts and Home Links With Cute Images

Replace Newer, Older And Home Links With Shiny Buttons In Blogger

0 comments

Newer-Older-and-Home-Links

This set consists of 8 Image Button Sets termed as Previous, Home and Next and categorized according to size as small, medium and large.

Check them together,


Home-Previous-Next Image buttons for blogger

Download

Note:- Also Includes Red and Light Blue Image Sets.

How To Replace Newer, Older and Home Link In Blogger?

For doing so follow the steps below,

  1. Go To Blogger > Layout > Edit HTML
  2. Check the Expand Widget Templates box at top-right-corner
  3. Search for this,

<data:newerPageTitle/>

And replace it with this code,

<img src="URL-OF-PREVIOUS-BUTTON"/>

Now search for this,

<data:olderPageTitle/>

And replace it with this,

<img src="URL-OF-NEXT-BUTTON"/>

Then search for this,

<data:homeMsg/>

The above code will appear twice and replace both appearances with this code,

<img src="URL-OF-HOME-BUTTON"/>


4.     Finally save your template and enjoy the new look!

Download

Subscribers Have already been emailed the free Download Copy. If you are not a subscriber and wish to receive the Download copy for the above image sets along with some innumerable other blogger resources then simply submit your email address in the Subscription Email form on the right sidebar.

Read more >>
Read More... Replace Newer, Older And Home Links With Shiny Buttons In Blogger

Most Attractive Read More Button Images For Blogger –Arrow Headed

0 comments

Thankfully I am again proud to present another unique blogger resource entitled Arrow Head Read More Image Buttons which are barely available in the blogosphere. I have created a set of 12 Images each of different colour and taste. Get rid of that Read More Link text and replace it with a cool MBT Read More Image button.

First have a look at them in the screen display below,

Blogger Arrow Head Read More Button Images


Downloads: 2073

To replace you Read More Link with one of these button images then do the following,

1. Go to Layout > Edit HTML

2. Back up your template

3. Press Ctrl + F , and in the search box write the read more text. You know it better whether to search for Read More or Continue Reading. Depends what text are you using.

Once you find the read more text in your blogger template then replace the text with the code below,

<img width="120px" height="32px"   src="URL Of Your Read More Button Image"/>


You can also resize the image. The default size is 120px by 32px. If you want a smaller one than you can use these proportions:

width=”100px” height=”27px”

width=”80px”  height=”21px”

I hope you like this new set of images. I will publish a new set tomorrow.

Read more >>
Read More... Most Attractive Read More Button Images For Blogger –Arrow Headed

Attractive Animated Read More Buttons For Blogger With Stylish Arrow Nose!

0 comments

Animated Read More Buttons

If a picture says a thousand words than it would not be objectionable to say that an animated image would speak a million words. Well if not you then at least I believe that way :>>

Its time to get rid of the Read More or Continue Reading Text and replace it with a cool, stylish and most importantly with an animated Read More Button. Give it an Arrow Nose!

Below is an example of an in-motion Read More Button with an animated arrow nose,

grey

greenpurple


Downloads: 918

Read more >>
Read More... Attractive Animated Read More Buttons For Blogger With Stylish Arrow Nose!

Blinking Read More Buttons For Blogger- With a Tiny Arrow Pointing Direction!

0 comments

Animated Read More Buttons

Animation is always eye-catching and seeks readers attention. In order to give a more lively look to blogger hosted blogs I am proud to present another set of beautiful animated Read More Buttons with metallic frame surrounding each one of them and a blinking tiny arrow to give the motion look.

This is how one such button looks in motion,


green black

blue-dark


MBT Read More Blogger Buttons - Metallic Frame

Downloads: 1417

Read more >>
Read More... Blinking Read More Buttons For Blogger- With a Tiny Arrow Pointing Direction!

SUPPORT US

Archive

Followers


About The Author

Categories

My Blogger Pedia. Copyright 2008 All Rights Reserved | Contact | about

/*featured start*/ /*featured start*/